Trouble shooting your pressure canner
There is nothing more
frustrating than when you have worked hard to get a batch of food prepared to
can and then your canner doesn’t work right or for you to have Old Faithful
erupting on your stove instead of staying in Yellowstone …
After 30 years of canning I
have learned several “tricks” All of them the hard way. In order to understand what is causing a
problem and how to fix it then you need to understand how each part of the
canner works together with the rest of the parts.
The normal run of the mill
canner: (mine is a Mirro 22 qt made in 1980, it has been in service full time
for 31 years)

Various parts of the canner:
Pot (See the locking lugs all the way around)

Lid

Gasket

Canner Racks.. One is always
placed on the bottom of the pot under your jars. The other is placed on top of the first level
and then a second level of jars on top of it.
This is when you are canning pints or half pints and are doing a second
level. You can not stack quart jars. Failure to use these will cause your jars to
break in the canner.

Stem

Pressure regulator (this is what regulates the
amount of pressure in your pot)

High pressure relief valve
(this is the safety mechanism to keep you from blowing the lid thru your
ceiling)
Lid locking mechanism (this
is also a safety mechanism to keep the lid from blowing thru your ceiling)

Problem: The
lid will not fit on right
Possible cause and solution
1.
The locking lugs
are not properly lined up
a.
Place the lid on
top of the canner with the lid handles a little off set from the pot
handles. Line up the lugs by sliding it
back and forth until the lugs fit together and the lid slides down. Then turn the lid until the handles on the
pot and the lid line up.
b.
If your lid
doesn’t not want to slide easily once it has seated on the lugs then coat the
gasket with a small amount of vegetable oil to help the gasket to slide on the
pot.
Problem: Canner will not reach correct pressure.
Turn off your burner and Slide the canner to a cool spot to cool
down before trouble shooting the problem.
Possible
cause and solutions:
1.
Gasket not
sealing
a.
Soak gasket in
hot water for 15 minutes
b.
if gasket seems
loose on the lid then you can stretch the gasket by working your way around
with both hands pulling on it
c.
try a coating of
vegetable oil
d.
Replace gasket
2.
not enough heat
a.
Increase heat
3.
If you have a
canner with wing nut type clamps then it is possible one of your clamps is not
tight.
Problem: Old faithful erupting on stove.
Steam is pouring out from
under the lid. Slide the canner to a cool spot to cool down before trouble shooting
the problem.
Possible causes and solutions
1.
Lid locking
mechanism did not lock
a.
Try Jiggling the
lid to get the mechanism to lock. Some canners
are very picky about the lid placement and this mechanism.
2.
Food is hung in
the lid lock mechanism
a.
Make sure your
lid and jars are clean before processing.
b.
Check the gasket,
under the gasket and the lid lock mechanism for pieces of food.
3.
Gasket not sealing
a.
Soak gasket in
hot water for 15 minutes
b.
if gasket seems
loose on the lid then you can stretch the gasket by working your way around
with both hands pulling on it
c.
try a coating of
vegetable oil
d.
Replace gasket if
it is dry, hard, cracked or torn.
4.
If you have a
canner with wing nut type clamps then it is possible one of your clamps is not
tight.
Problem: The high pressure valve just popped
(Hurry and throw a damp rag
on top of the valve so that you do not lose your jars, do not get your hand in
the way of the steam it will burn you). Slide the canner to a cool spot to cool
down before trouble shooting the problem.
Possible
causes and solutions
1.
Stem is clogged
a.
Always make sure
your pot and lid is clean before you use it and make sure your jars are clean
when you put them in.
Problem: The pressure regulator quit jiggling and is
now just blowing a steady stream of steam
Possible cause and solution
1.
Too much pressure
in pot
a.
Turn down your
fire a bit
Problem: The pressure regulator quit jiggling and is
not blowing steam out
Possible cause and solution
1.
not enough
pressure in the pot
a.
Turn up your fire
a bit
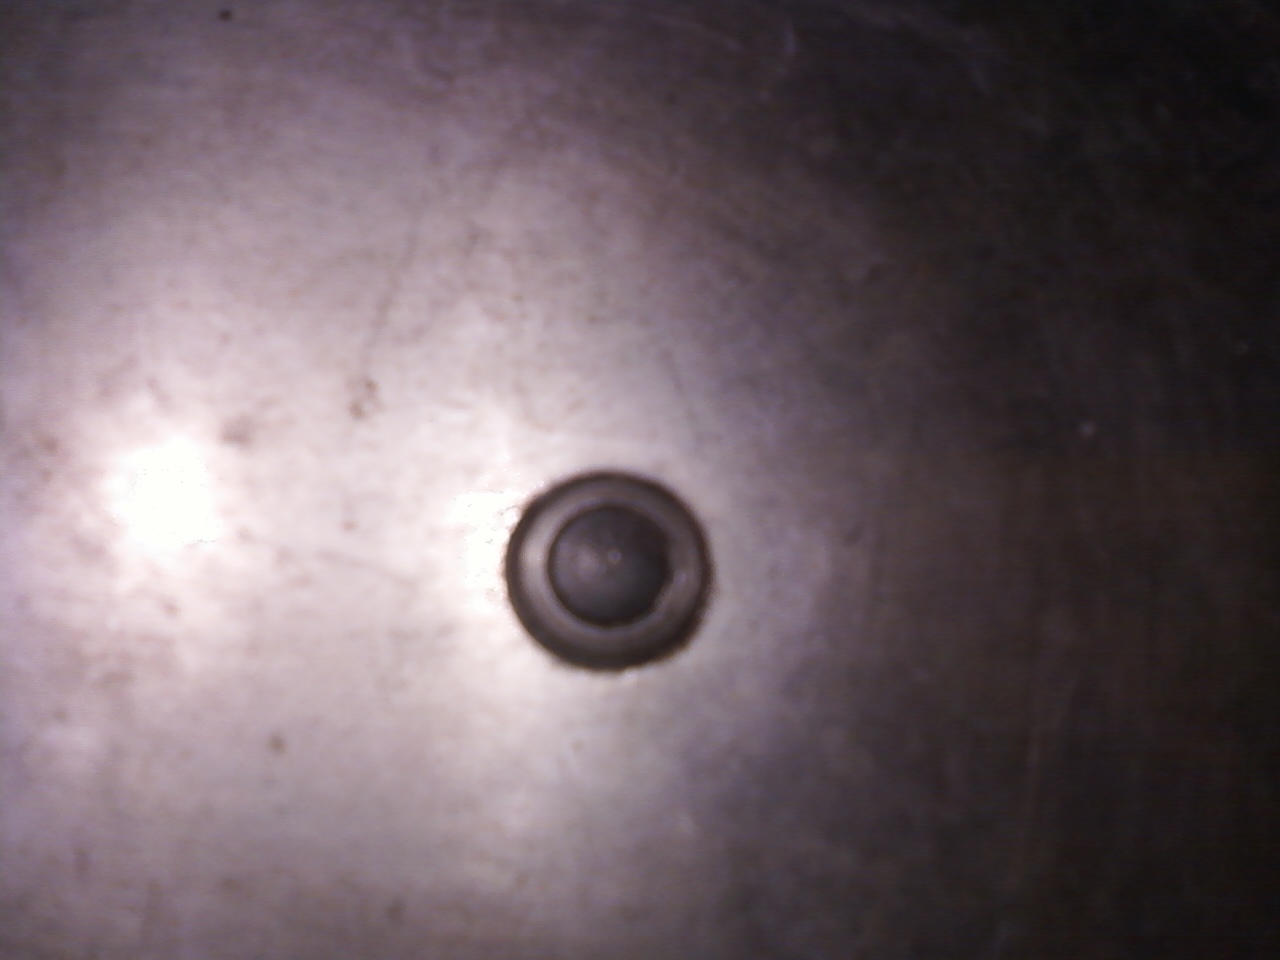
Problem: You
just bought a new gasket for your Mirro Canner and now it won’t seal or the
gasket only lasts a few times of running the canner before it fails again.
Possible cause and solution
1.
Turn your pot
over and look at the manufacturing date.
You see the 12 80 on mine (See picture below). The Mirro 22qt made before 1983 requires a
different gasket than is sold at the hardware store now. You probably have the wrong gasket. There are several sites on the internet that
sells the older replacements. You can
call the manufacturer to make sure of what part you need. Gaskets that are used regularly should last
3-5 years. Usually what causes them to
fail is not using them and they dry out.

Problem: Lids
not sealing
Possible causes and solutions
1.
Rims not clean
when lids are placed on
a.
Wipe the rims
with a clean damp cloth before placing your hot lids on them
2.
Pressure being
dropped too fast
a.
Never drop the
pressure artificially. Allow the pot to
cool on its own. By dropping the
pressure it causes negative pressure in your pot and will pull the jar contents
out into the pot from under the lids.
3.
Using used metal
lids
a.
Never reuse a
metal lid. The only lids suitable for
repeated use are Tattler lids with gaskets.
4.
Not enough
headspace
a.
Leave about ¾’s
of an inch between the top of your food and the top of your jar. The jars will boil in the canner and if you
do not have enough empty space in the jar then the contents will be pushed out
of the jar causing grease and food to get under the lid.
5.
Rings not tight
on metal lids
a.
Tighten rings
over metal lids prior to processing
6.
Rings too tight
on tattler lids before processing or not tightened down after processing.
a.
Tighten and then
back off the rings over a Tattler lid ¼ inch then tighten the rings after the
jars are processed and removed from the canner.
Use an oven mitt the jars are HOT!!!
Remember: if at any time you lose the pressure in your
pot you have to start retiming the food from the time you rebuild pressure!!
Remember: Always let the canner vent steam for at
least 10 minutes before placing the weight on the stem. This allows the air to evacuate the pot and
makes sure the stem is clear.
Remember:
Always make sure your canner is clean and the jars are clean before
canning or you can clog your stem.
Inspect it before each use.
Remember:
Always make sure you have enough water in the pot to run the entire
processing time. If you let a canner run
dry you will warp the pot and break your jars.
Remember: NEVER
drop the pressure purposely by removing the weight or running cold water over
the pot. Always allow the pot to cool
naturally by only sliding it to the cool side of your stove or counter. Failure to do this can cause steam/burn
injuries, broken jars and seal failure.
Remember: Any time there is a problem with your canner
gently and carefully slide it to a cool place and then leave it alone until the
pressure has subsided. If too much pressure
builds it will make a howling sound from the steam escaping the escape valve or
from under the lid. The escaping steam
will burn you!!!


